If your students or homeschooler struggle with finding equivalent fractions, you are not alone and you’re in the right place. Before you start teaching adding and subtracting fractions, you’ll want to make sure your students are solid in finding equivalent fractions as it’s crucial in building a strong mathematical foundation.
What Are Equivalent Fractions?
Equivalent fractions are different fractions that represent the same value or proportion of a whole. They may have different numerators (the top number) and denominators (the bottom number), but when simplified or reduced, they equal the same fraction. For example, 1/2 is equivalent to 2/4 and 4/8 because all three fractions represent the same portion of a whole.
Finding equivalent fractions proficiently is critical for students because they need this knowledge when they are comparing fractions, adding and subtracting fractions, and reducing or simplifying them.
What’s the best way to teach equivalent fractions?
The best way to teach equivalent fractions is to start with visual models like number lines and fraction bars. Visual models help students have conceptual understanding of the fraction operations they will later perform. Whenever I introduce any math concept, I ALWAYS start with pictures and visual models. ALWAYS!
Step-by-Step Directions To Teach Equivalent Fractions Using Visual Models
If you have advanced students, you may want to teach more than one lesson in a day. Gauge your students’ progress by giving exit tickets to them and by consistently checking their work while they are solving problems.
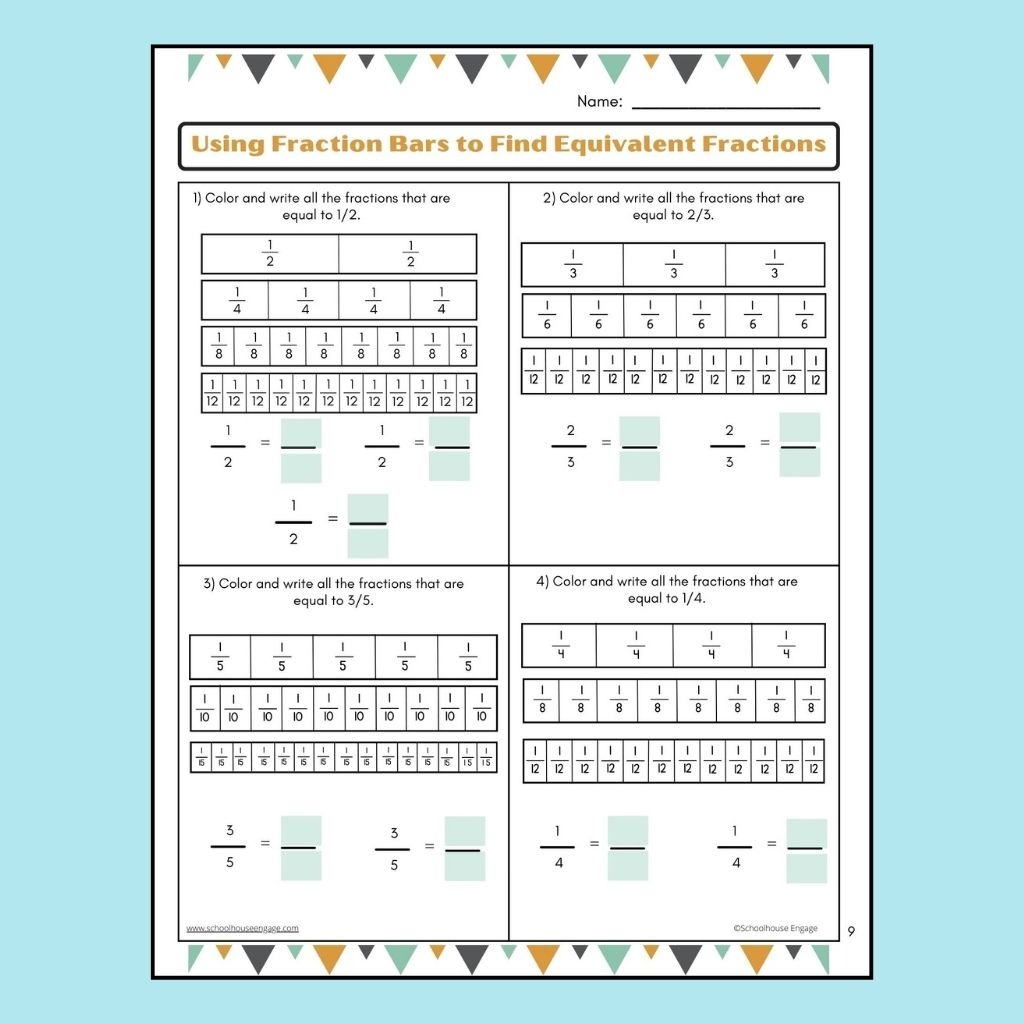
Day 1 Introduce Equivalent Fractions with Fraction Bars
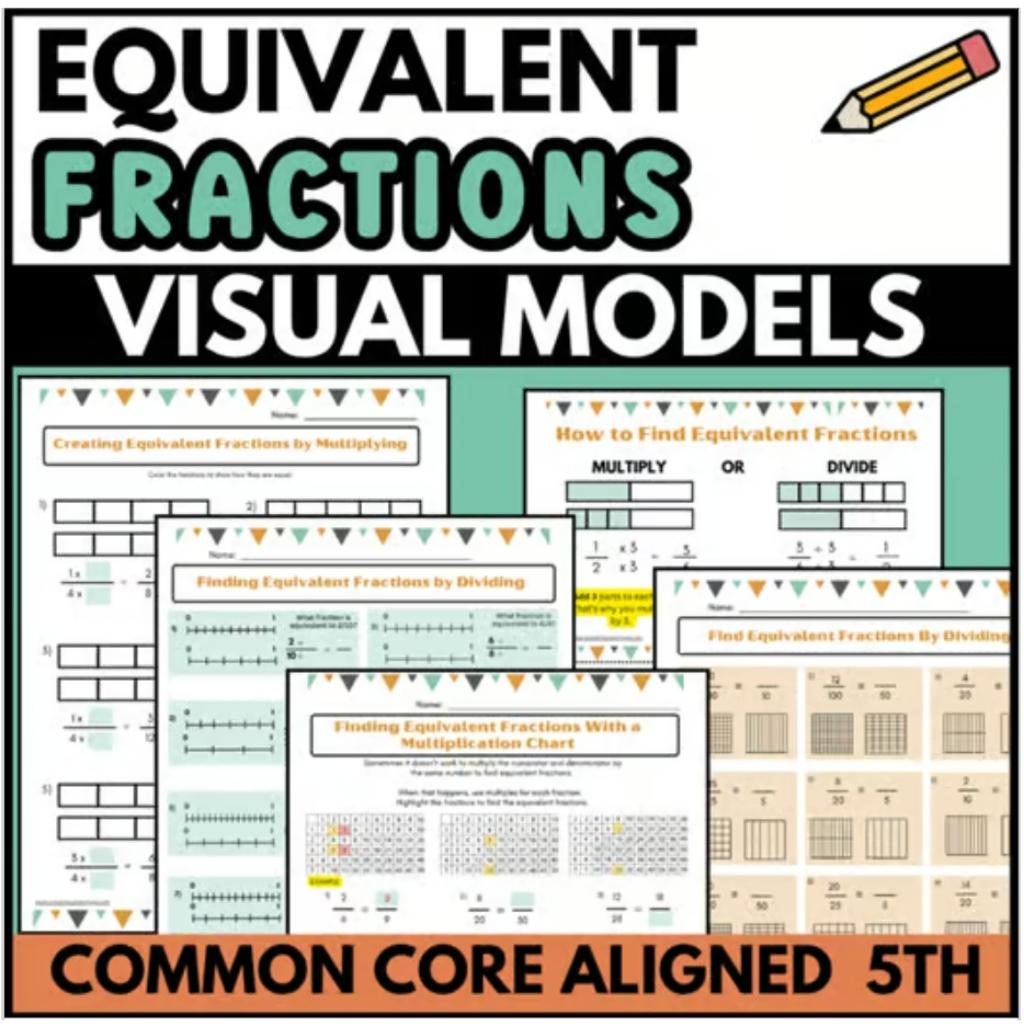
When you introduce equivalent fractions, teach it using long rectangles or fraction bars. Students color in fractions within rectangles to visually compare and see equivalency.
This is a fun activity for students because they get to color the fraction bars. I use the printable below that you can get here. We also write out the fractions so students can see how they are all equivalent.
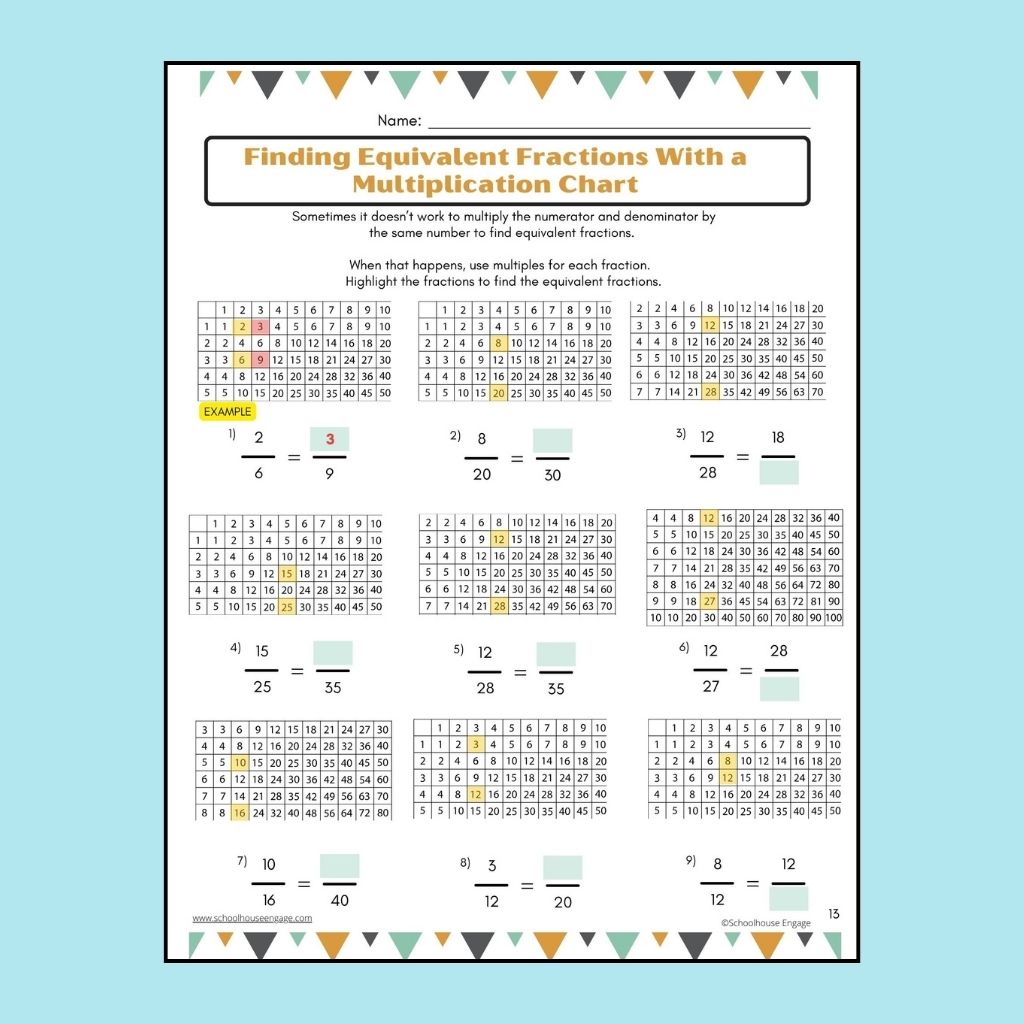
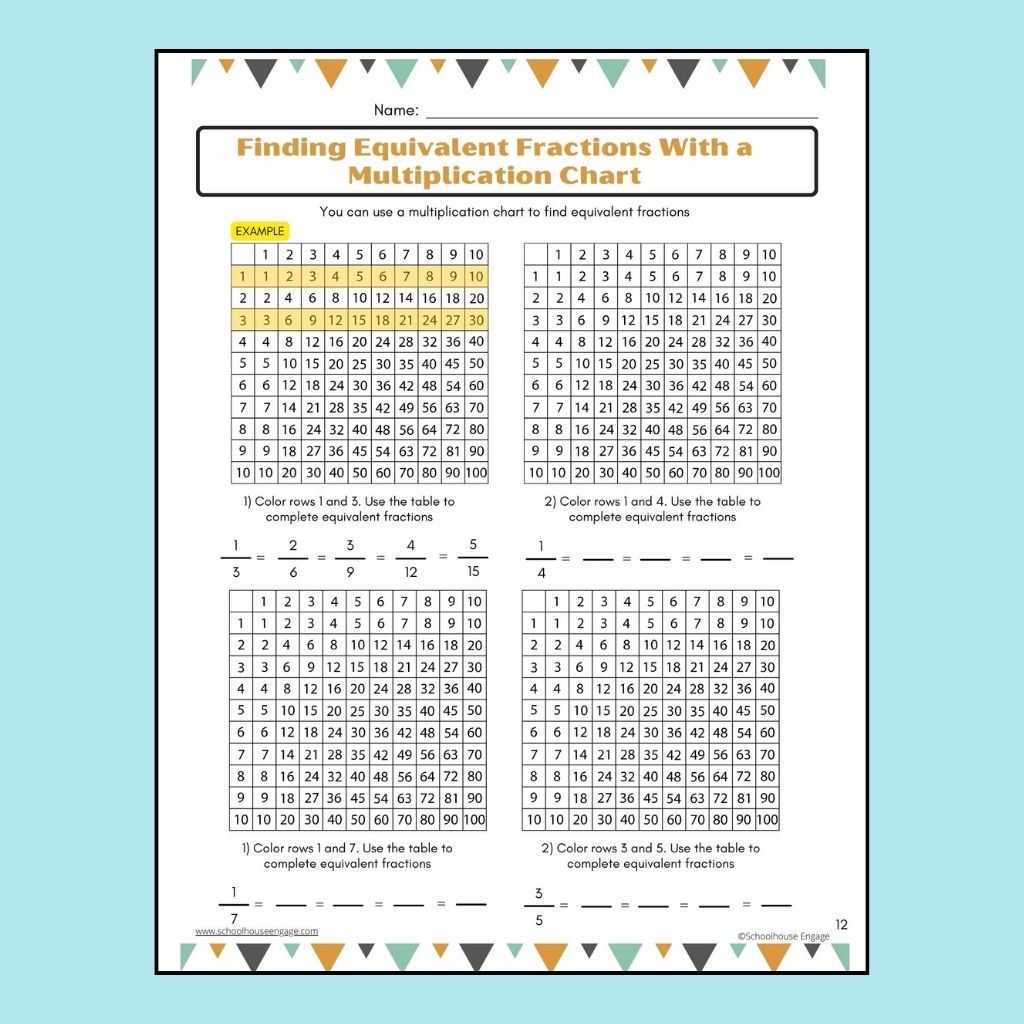
Day 2: Teach the Multiplication Chart Method for Finding Equivalent Fractions
Students need to learn the relationship between fractions and the times table. Explain to students that since we multiply to find equivalent fractions, we can also use a multiplication chart. I use the worksheets below to teach my students how to do this.
A complete times table chart can overload some students visually, so the worksheets below are beneficial because only parts of the timetable are shown.
Get these worksheets HERE.
Using a multiplication chart to find equivalent fractions will be helpful for your students who struggle in math. It’s important that students know that they can use a multiplication chart to find equivalent fractions.
It’s also a useful tool for your students who still haven’t memorized their timetables. I explain how to use a multiplication chart to find equivalent fractions in the video below.
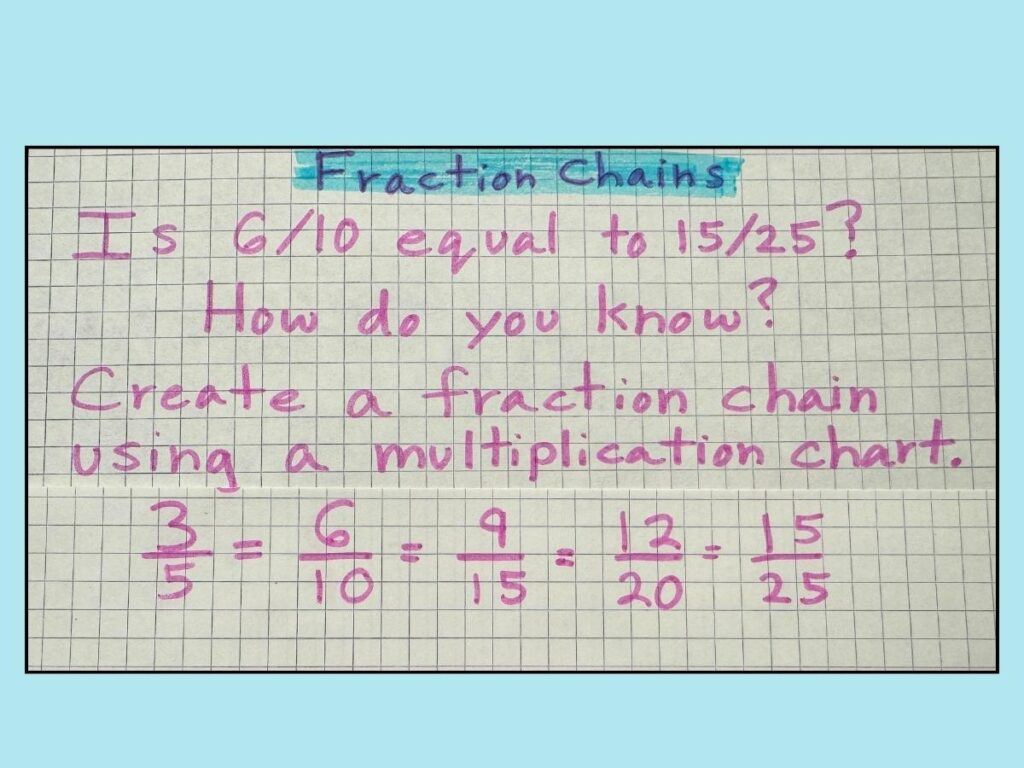
Create a fraction chain using the multiplication chart. See below. Show them an example, do one together, and have them complete one by themselves. Then ask questions like, is 6/10 equal to 15/25? Or is 4/6 equal to 8/12? How do you know?
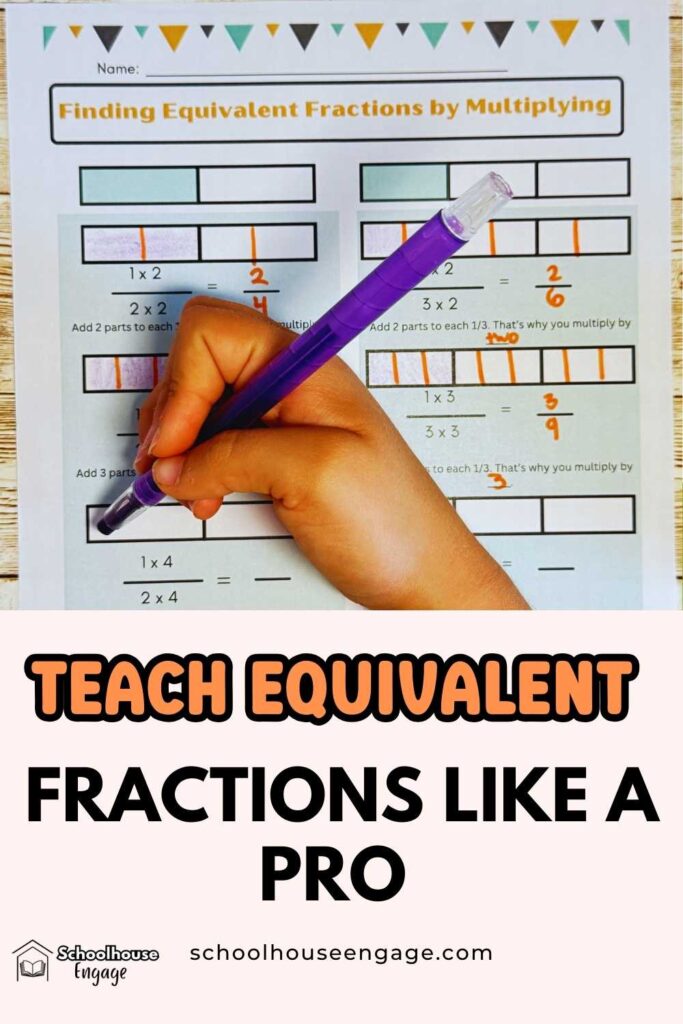
Day 3: Split Fractions into Equal Parts
Show your students how to split rectangles into equal parts. Start with 1/2 as an example. We add two parts to the half, which is equivalent to multiplying by 2. Then we add 3 parts to 1/2, which is equivalent to multiplying by 3. Allowing students to recognize these patterns helps students with conceptual understanding. We repeat these examples by adding parts to 1/3s.
You can find the above worksheet HERE. You can also just draw out the fractions if you are working with one student, but if you have a classful of kids, using this worksheet makes it a lot easier so students don’t have to draw all the fractions which can get cumbersome.
Make sure to go over the fact that even if let’s say the fraction is 1/4, you only draw 3 lines inside the rectangle. Some of your struggling learners need to be taught this explicitly. They might draw 4 lines inside so keep reminding them about this.
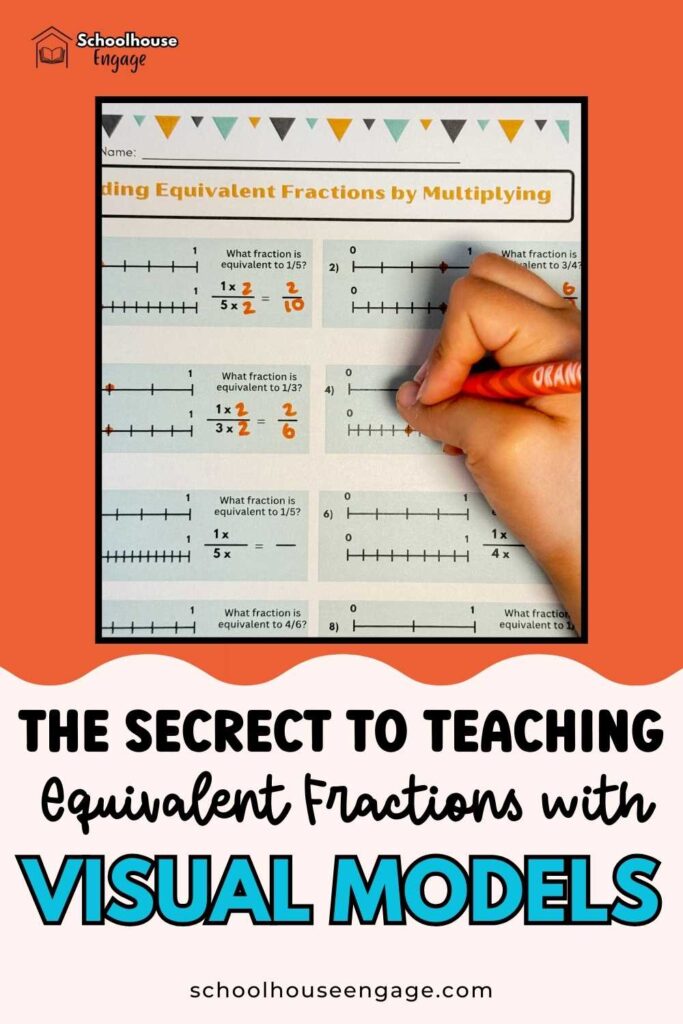
Day 4: Create Equivalent Fractions Using Number Lines
Number lines visually represent fractions and your students should know how to create number lines to represent fractions. Teach them explicitly how to plot the fractions.
Steps to Teach Drawing Number Lines to Show Equivalent Fractions
1. Start all your number lines by writing 0 and 1 and teach them how to draw the lines inside.
2. If you have to plot 1/4, teach them to draw 3 lines to make fourths.
3. Draw your number lines with equivalent fractions vertically so your students can look straight down and see that the value is the same.
4. Show your students how different fractions can occupy the same point, showing equivalency.
Plotting Equivalent Fractions Using Number Lines
On day 3 have your students plot fractions using lines to visually compare and see equivalency. Your students will need to determine what the multiplier is and the equivalent fraction. Once they have the hang of this, we do the same activity with determining what the divisor is and the equivalent fraction. Watch the video I created below to see what I mean!
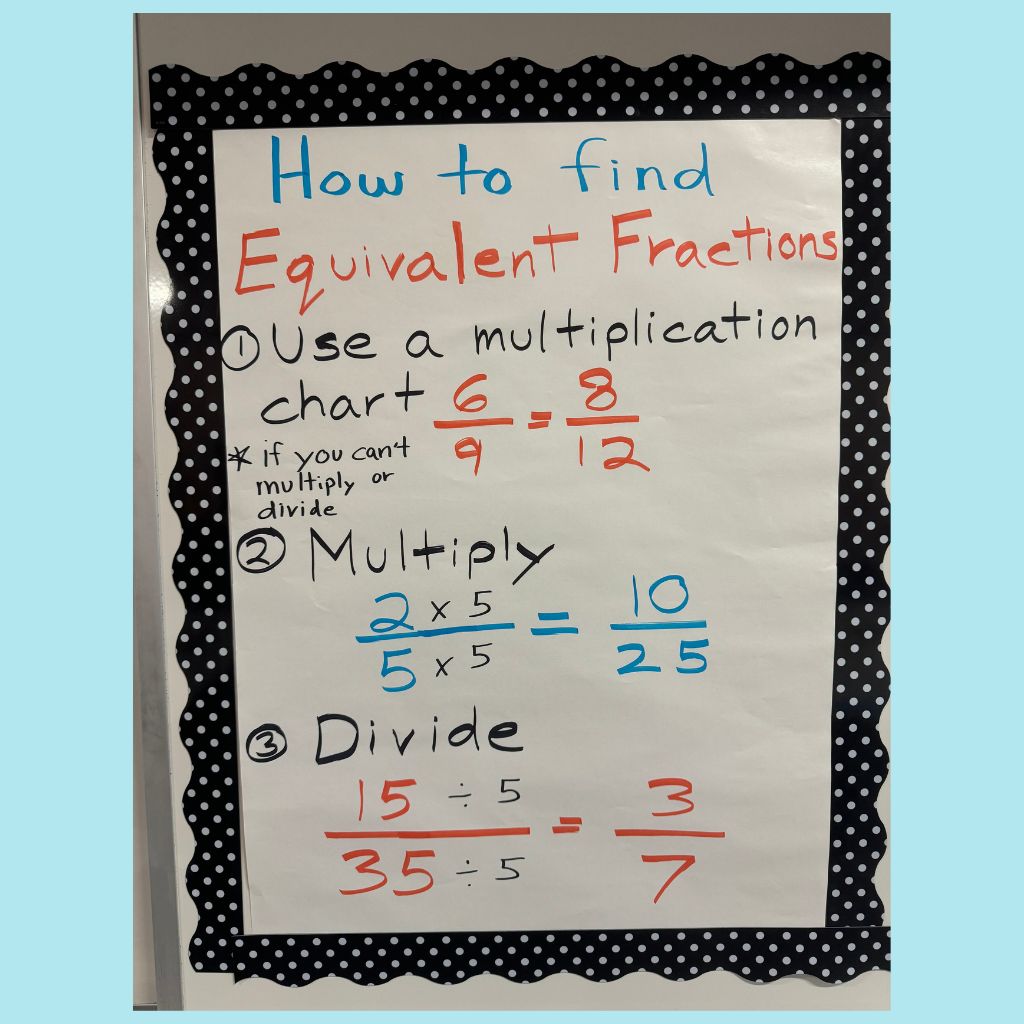
Explain Why We Multiply and Divide to Find Equivalent Fractions
Teach your students the reasoning behind the operations that they do. We multiply to find equivalent fractions because we are adding parts to the fraction. The video below explains it all!
Once my students have a good grasp of that idea (usually the next day), I show them how the reverse is true. If we are subtracting parts of the fraction, then we are dividing since dividing is repeated subtraction.
Day 5: Teach the Algorithm to Find Equivalent Fractions
Once your students have success with creating equivalent fractions with visual models, move on to the algorithm.
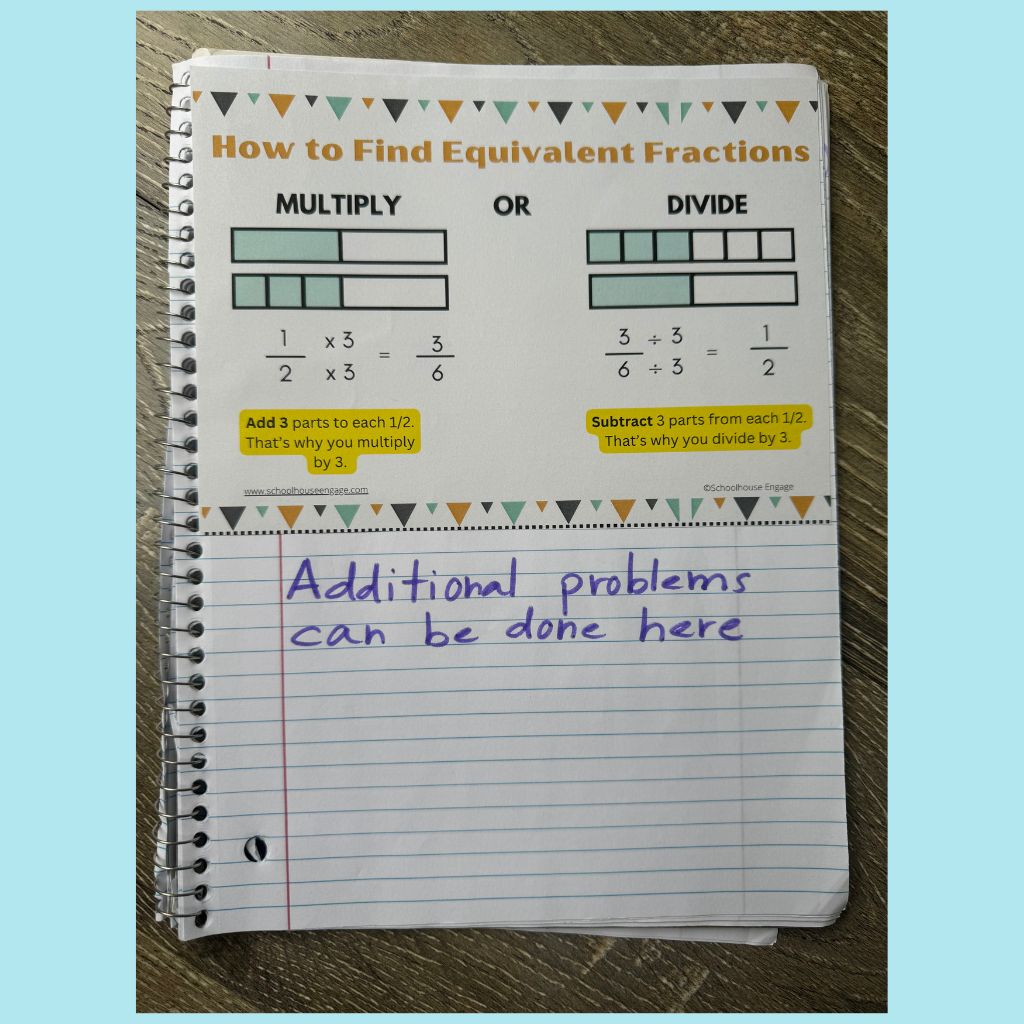
Multiply and Divide the Numerator and Denominator by the Same Number
Explain to your students that multiplying or dividing the numerator and denominator by the same number creates equivalent fractions.
Sometimes students aren’t sure whether to multiply or divide. Explain that when the fraction numbers are increasing, they are multiplying, and when the fraction numbers decrease, they are dividing.
Since students easily forget how to solve math problems, I always have them paste a reference sheet in their math notebooks like the one below and I post an anchor chart in the classroom that they can refer to.
Day 6: Finding Equivalent Fractions with Denominators of 20, 25, 50, and 100
Students in 5th grade benefit from practicing equivalent fractions with denominators of 20, 25, 50, and 100 so that when they start working on decimals, they will have an understanding of the equivalency of one and two-digit decimals. For example, 80/100 is equal to .8 (8/10)
Students also get to practice multiplication with larger numbers that we find in our currency, like $20 bills.
Day 7 and beyond: Practice the Algorithm
Once students show proficiency in solving problems with visual models, they are ready to solve problems using only the algorithm; no pictures are needed. The steps they will use to solve equivalent fractions will have meaning when they have a full grasp of how they are solving problems. They will also apply their knowledge of equivalent fractions to word problems. Be sure to revisit this skill throughout the year.
If you need Equivalent Fraction worksheets with visual models, check out my TPT store for the worksheets featured in this blog post.
Final Thoughts
Taking the time to use visual models of fraction bars and number lines to create equivalent fractions will help build the foundation of understanding equivalent fractions. Be patient and supportive of your students as it will take many of them time to master this skill. If you would like to have visual models already created and ready to go for you to teach, get my worksheets here. You got this! Giselle
Save this post for later. Click on the image below to save it to your teacher’s Pinterest board. 📌📌📌
For more blog posts about this topic, check out:
How to Teach Adding and Subtracting Fractions
How to Help Struggling Math Students